
To remove fender flare adhesive, use a heat gun to soften the adhesive, then gently peel it off. Clean residue with adhesive remover.
When it comes to vehicle maintenance, removing fender flare adhesive is a common task that requires careful attention to detail. Over time, the adhesive used to attach fender flares can become old and brittle, making it necessary to remove and replace them.
In this blog post, we will discuss the step-by-step process of removing fender flare adhesive, ensuring that you can effectively clean and prepare your vehicle for new fender flares. By following these instructions, you can safely and efficiently remove fender flare adhesive without causing damage to your vehicle’s paint or bodywork.
Introduction To Fender Flare Adhesive Removal
Fender flare adhesive can be a stubborn residue to remove, leaving behind a sticky mess that can be frustrating to deal with. The challenge with removing fender flare adhesive lies in ensuring that the surface is clean and free from any residue. A clean removal is important to ensure that the new adhesive will bond properly and the fender flare will stay in place.
One effective method to remove fender flare adhesive is to use a heat gun or hair dryer to soften the adhesive. Once the adhesive is soft, use a plastic scraper or credit card to gently scrape away the residue. Another option is to use a solvent such as rubbing alcohol or adhesive remover to dissolve the adhesive. Be sure to test the solvent on a small, inconspicuous area first to ensure that it won’t damage the paint or surface.
| Tools Needed: | Steps: |
|---|---|
| Heat gun or hair dryer | 1. Soften the adhesive with heat gun or hair dryer 2. Gently scrape away the residue with a plastic scraper or credit card 3. Clean the surface with rubbing alcohol or adhesive remover 4. Repeat if necessary |
| Rubbing alcohol or adhesive remover |
By following these simple steps, you can remove fender flare adhesive and ensure a clean surface for the new adhesive to bond properly. Remember to take your time and be patient, as rushing the process can lead to damage or an incomplete removal.
Preparation Steps
Gathering necessary tools is the first step in the preparation process. Be sure to have adhesive remover, plastic pry tool, and cleaning solution ready. Safety precautions are essential, so wear protective gloves and safety goggles. This will help prevent any skin irritation or eye injury. Proper ventilation is also important, so work in a well-ventilated area or use a respirator mask.
Initial Cleaning
When removing fender flare adhesive, it is crucial to start with an initial cleaning. This involves washing the area thoroughly to remove any dirt, grime, or debris that may be present. Use a mild soap or automotive cleaner and a soft cloth or sponge to gently clean the surface. Pay special attention to the area around the fender flare adhesive, ensuring that it is clean and free from any residue.
After washing, it is important to dry the area thoroughly. Use a clean, dry cloth or towel to remove any moisture from the surface. This will help ensure that the adhesive removal process is effective and that the new adhesive will adhere properly.
By following these steps and properly cleaning the area, you can prepare the surface for the removal of the fender flare adhesive. This will help ensure a successful adhesive removal process and allow for the proper installation of new fender flare adhesive.
Heat Application Techniques
| Heat Application Techniques | |
|---|---|
| Using a heat gun | Hairdryer as an alternative |
When removing fender flare adhesive, heat application is crucial. Using a heat gun is an effective method. Hold the gun a few inches away from the adhesive and move it consistently to avoid overheating. An alternative to a heat gun is a hairdryer. It may take longer, but the heat will soften the adhesive for easier removal.
Adhesive Removal Solutions
When removing fender flare adhesive, there are several commercial adhesive removers available. These products are specifically formulated to dissolve tough adhesives without damaging the surface underneath. Additionally, DIY solutions using common household items such as rubbing alcohol, vinegar, or WD-40 can be effective in removing adhesive residue. It’s important to test any adhesive removal solutions on a small, inconspicuous area first to ensure they won’t cause damage. When using commercial removers, always follow the manufacturer’s instructions and use protective equipment. Protective gloves and goggles are essential to ensure safety. After applying the chosen adhesive removal solutions, allow them to sit for a few minutes before gently scraping away the adhesive with a plastic scraper or soft cloth. Finally, thoroughly clean the area with soap and water to remove any remaining residue.
Mechanical Methods
To remove fender flare adhesive, use mechanical methods like heating with a heat gun to soften the adhesive. Then, carefully peel off the fender flare, taking care not to damage the surface underneath. Finally, use a residue remover to clean any remaining adhesive for a smooth finish.
| Mechanical Methods |
| – Use plastic razor blades to gently scrape off adhesive residue. |
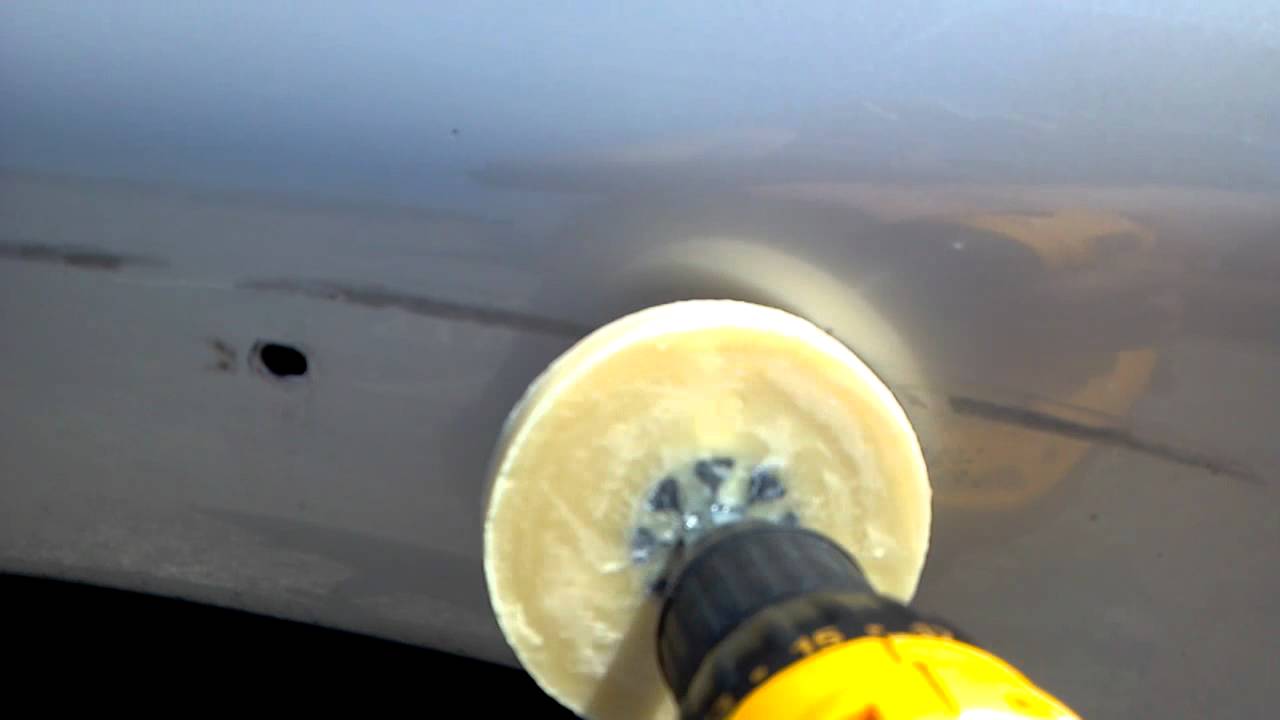
| – Rubber eraser wheel tool is effective in removing tough adhesives without damaging the surface. |
Finishing Touches
To remove fender flare adhesive, start by heating the adhesive with a heat gun or hairdryer to soften it. Then, use a plastic pry tool to carefully peel off the adhesive. Finally, remove any remaining residue with adhesive remover and a clean cloth.
| After removing the fender flare, clean the surface thoroughly. | Use rubbing alcohol to eliminate any remaining adhesive residue. |
| Polish the area to ensure a smooth and even finish. | Apply a quality wax to protect the surface from future damage. |
Troubleshooting Common Problems
When dealing with stubborn adhesive, it is important to use the right products. Start by applying a adhesive remover to loosen the adhesive. Be sure to follow the instructions carefully. For minor paint damage, consider using a touch-up paint to cover any imperfections. Remember to match the paint color exactly. After removing the adhesive, clean the area thoroughly to ensure a smooth surface. Finish by applying a wax or sealant to protect the area.
Frequently Asked Questions
How Do I Remove Fender Flare Adhesive?
To remove fender flare adhesive, you can use a heat gun or a hair dryer to soften the adhesive. Then, use a plastic scraper to remove the adhesive. If there is any residue left, use a rubbing alcohol or a adhesive remover to clean it.
Is Fender Flare Adhesive Hard To Remove?
Fender flare adhesive can be difficult to remove if it has been on the vehicle for a long time. However, with the right tools and techniques, it can be removed without damaging the vehicle’s paint or finish.
Can I Use A Chemical Remover To Remove Fender Flare Adhesive?
Yes, you can use a chemical adhesive remover to remove fender flare adhesive. However, make sure to read the instructions carefully and use the proper safety equipment such as gloves and protective eyewear. Additionally, test the remover on a small, inconspicuous area before using it on the entire vehicle.
Conclusion
To wrap up, removing fender flare adhesive is a task that requires careful attention and the right techniques. By following the steps outlined in this blog post, you can effectively remove the adhesive without causing any damage to your vehicle’s surface.
Remember to gather the necessary tools, prepare the area properly, and take your time to ensure a successful removal process. With these tips in mind, you’ll be able to restore your fender flare to its original state and keep your vehicle looking its best.